- 01: About the Trex Plug-based Decking Fastener System (Scalloped-core) →
- 02: Installing Trex Plug-based Decking Fastener System →
Features and Benefits
- Versatility: The system allows you to place the fastener anywhere on the Enhance deck board without compromising holding power.
- Ease of Installation: Utilizing a teal-colored counterbore tool and depth setting tool, the system ensures efficient and precise installation.
- Seamless Look: The collated Enhance plugs effortlessly conceal the screws, enhancing the overall look of your deck.
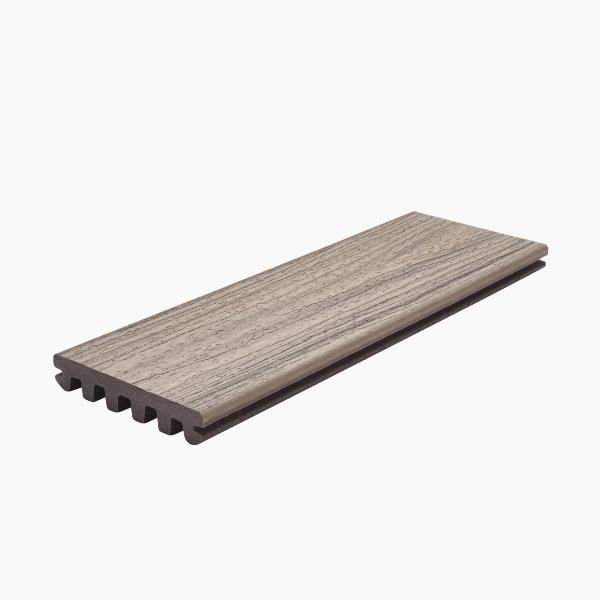
- Performance: Made entirely of Trex Enhance decking shell material, the plugs deliver exceptional durability and performance.
- Warranty: Backed by the same warranty as Trex Enhance decking, you can trust in the longevity of your deck.
Step 1: Confirm Product Compatibility
Only use Trex Enhance/Fascia Plug-based fastening systems with the Trex Enhance decking for compatibility. Also, for installations on sleepers, ensure a minimum sleeper height of 2 inches to prevent screw tip protrusion.
Step 2: Pre-drill
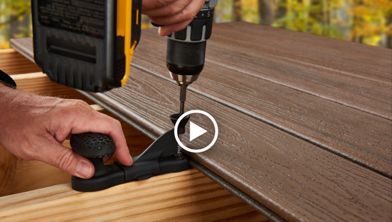
Use the Counterbore Tool Kit, containing a counterbore bit and two depth setters. Position the counterbore tool at least 1 inch from a board end or edge, perpendicular to the board's face. Drill until the counterbore cup stops spinning, ensuring a clean hole.
Step 3: Drive the Screw
With the Enhance depth setter tool, drive the plug-based Enhance decking screw into the pre-drilled hole until you hear a change in the driving sound, indicating proper depth. Use a drill for this step to ensure precision.
Step 4: Install the Plug
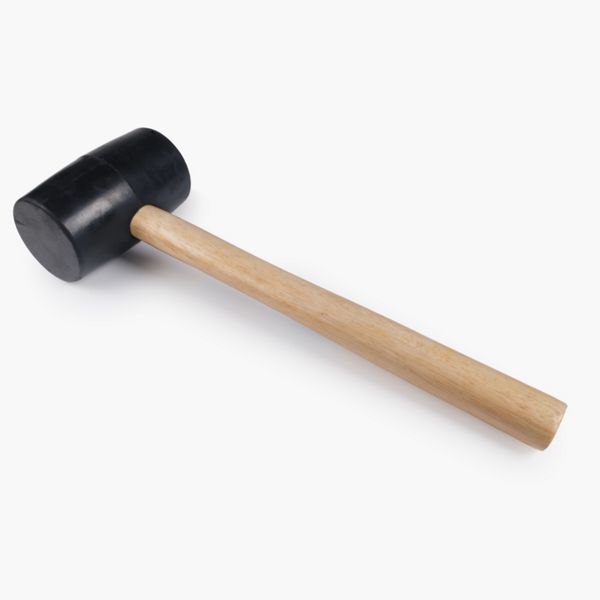
Clean any debris or water from the counterbore hole. Center the plug over the hole, aligning the grain with the board's grain. Press the plug into place, then tap it flush with the board's face using a smooth-faced hammer. With practice, you may skip pressing the plug and use the hammer directly.
Plug Removal
To remove a plug and fastener, drive a sharp-point screw into the plug about 1/4 inch. Place a block of wood or decking nearby, then gently pry the plug out using a claw hammer. Use a standard T-20 bit to remove the screw once the plug is out.


This content was partially or fully generated by AI and has been reviewed by our team to ensure accuracy and relevance.


Copyright © 2026 Trex Company, Inc. All rights reserved.
Photos and videos © 2026 Warner Bros. Discovery, Inc. or its subsidiaries and affiliates. All trademarks are the property of their respective owners. All rights reserved.
- Country
-
Australia
-
Austria
-
Bahrain
-
Brazil
-
Canada English
-
-
Chile
-
Colombia
-
Costa Rica
-
Cyprus
-
Czech Republic
-
Fiji
-
France
-
Germany
-
India
-
Ireland
-
Israel
-
Kuwait
-
 Lithuania
-
Mexico
-
Netherlands
-
New Zealand
-
Norway
-
Oman
-
Qatar
-
Saudi Arabia
-
South Africa
-
Spain
-
Sweden
-
Switzerland
-
Turkey
-
United Arab Emirates
-
United Kingdom
-
United States
-
Venezuela
By choosing your country, you acknowledge that you have read Trex's Privacy Policy